
Configuring the settings for the Folder Sync task
As part of setting up Folder Sync you must configure the settings for the Folder Sync task.
Note: When you upgrade Folder Sync, some of the Folder Sync task configuration values are retained. You must check whether these values are still appropriate. For upgrades from Folder Sync 1.12 or earlier it is usually appropriate to increase theConcurrent Mailboxesvalue from its old default value of 30 to the new default value of 50. This new default value reflects the increased processing efficiency of the new version.
To configure settings for the Folder Sync task
-
Log on to the Folder Sync server using the Folder Sync service account credentials.
-
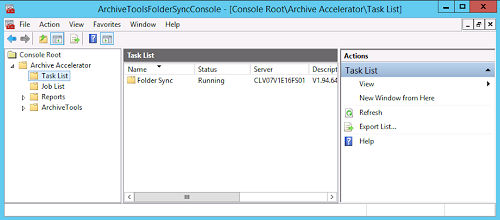
Click Start > All Programs > ArchiveTools > ArchiveTools Management Console.
-
In the left pane of the management console, expand the Archive Accelerator folder and select the Task List folder.
-
In the central Task List pane, right-click the Folder Sync folder and select Properties.Note: If you have set up multiple instances of Folder Sync on separate servers, theTask Listpane shows the Folder Sync task for each server. Select the task for the required server.
-
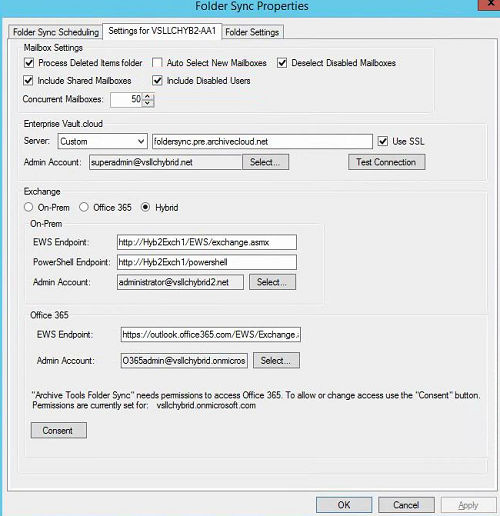
On the Folder Sync Properties dialog, select the Settings for computer_name tab and enter the required information as described in the following steps.
-
Under Mailbox Settings, select the required processing options as follows:
Process Deleted Items folder Select this option if you want to provide Folder Sync users with a Deleted Items folder in Alta Personal Archive\: - If this check box is selected, any items that are moved to the Deleted Items Folder in Outlook appear in the Deleted Items Folder in Alta Personal Archive after synchronization. - If this check box is cleared, the Deleted Items Folder does not appear with the other synchronized folders in Alta Personal Archive. Items that are moved to the Deleted Items Folder in Outlook remain in the original mailbox folder in Alta Personal Archive after synchronization. Auto Select New Mailboxes Select this option if you want scheduled Folder Sync synchronizations to target any new mailboxes that are added between the synchronizations. For every newly added mailbox, Folder Sync sets the Selected value to True in the mailbox database table. Note: If you select this option before Folder Sync has performed its first scheduled synchronization, Folder Sync also sets theSelectedvalue toTruefor all existing Office 365 mailboxes. Scheduled synchronizations target all existing mailboxes in addition to any newly added ones. If you select this option after Folder Sync has performed its first scheduled synchronization, Folder Sync does not change theSelectedvalue for existing mailboxes. Only newly added mailboxes are targeted automatically. Note: Do not select theAuto Select New Mailboxesoption unless you have sufficient Folder Sync licenses for the provisioned Alta Personal Archive users in your Office 365 environment. Deselect Disabled Mailboxes Select this option if you want to stop Folder Sync from synchronizing disabled mailboxes. If a mailbox becomes disabled, Folder Sync deselects the mailbox from further processing. Include Shared Mailboxes Select this option to include shared mailboxes in Folder Sync's All Mailboxes list. The shared mailboxes are then available for selection in Folder Sync. Include Disabled Users Select this option to include disabled users in Folder Sync's All Mailboxes list. The disabled users are then available for selection in Folder Sync. Concurrent Mailboxes Select the number of mailboxes to be processed at the same time. The default value of 50 is recommended for most configurations. -
Under Veritas Alta Archiving, enter the details of your Veritas Alta Archiving environment as follows:
Server From the drop-down list, select your Veritas Alta Archiving region. Folder Sync then populates the data center location box with the appropriate value. If your Veritas Alta Archiving region is not listed in the drop-down list, or if you are unsure about what to select, contact Veritas Services & Support . If you select Custom you can enter a customized data center location. Do not use this option except under the direction of Veritas Services & Support. Use SSL Select this check box if you want to use a secure connection between the Folder Sync server and the Veritas Alta Archiving archive server. Admin Account Provide the credentials of the Veritas Alta Archiving administrator account that you want Folder Sync to use. The account must have the administrator role in the Veritas Alta Archiving Veritas Alta View Compliance and Governance Management Console under Role Management > Assign Accounts . Click Select and enter the account user name and password. Enter the user name in UPN format, such as administrator @ company.com Test Connection When you have entered the Veritas Alta Archiving configuration information, click Test Connection to test whether Folder Sync can make the connection to your Veritas Alta Archiving company with the supplied details. -
Under Exchange, select the mailbox synchronization option that you want this instance of Folder Sync to support:
-
On-Prem : On-premises Exchange mailbox synchronization.
-
Office 365 : Office 365 mailbox synchronization.
-
Hybrid : Hybrid environment, that is with both on-premises Exchange and Office 365.
-
-
If you selected On-PremorHybrid in step 8, complete the On-Prem settings as follows:Note: For Exchange 2007, only theEWS Endpointmust be set. Leave the other two settings with no value set.
EWS Endpoint Enter the Exchange Web Services endpoint for the Exchange server. To obtain the EWS endpoint for an Exchange server, enter the following command on the server, in the Exchange Management Shell: get-webservicesvirtualdirectory \| select internalurlThe URL is typically of the format: https:// /EWS/Exchange.asmx where is the fully qualified domain name of the on-premises Exchange server. PowerShell Endpoint Except for Exchange 2007, enter the PowerShell endpoint for the Exchange server. To obtain the PowerShell endpoint for an Exchange server, enter the following command on the server, in the Exchange Management Shell: get-powershellvirtualdirectory \| select internalurlThe URL is typically of the format: http:// /powershell where is the fully qualified domain name of the on-premises Exchange server. Note: For Exchange 2007, do not set a value. Admin Account Except for Exchange 2007, click Select and enter the account user name and password for your prepared on-premises Exchange administration account. Enter the user name in UPN format, such as administrator @ company.com If you install Folder Sync on multiple servers for load sharing or redundancy, each Folder Sync's Folder Sync task must use a different on-premises Exchange admin account. Note: For Exchange 2007, do not set a value. The Folder Sync service account credentials are used automatically. -
If you selected Office 365orHybrid in step 8, complete the Office 365 settings as follows:
EWS Endpoint Use the supplied Office 365 Exchange Web Services endpoint\: https://outlook.office365.com/EWS/Exchange.asmx PowerShell Endpoint Use the supplied Office 365 PowerShell endpoint\: https://ps.outlook.com/powershell Admin Account Click Select and enter the account user name and password for your prepared Office 365 administration account. Enter the user name in UPN format, such as administrator @ company.com Note: If you install Folder Sync on multiple servers for load sharing or redundancy, each Folder Sync's Folder Sync task must use a different Office 365 administration account. -
When you have completed the configuration and successfully tested the connection to Veritas Alta Archiving, click OK.
-
Restart the Folder Sync task to complete the configuration.
Related information