
Configuring SCIM archiving by using Azure Active Directory
Before configuring SCIM archiving, review the following points to ensure proper configuration.
-
The SCIM app pushes user and group objects along with any membership delta.
-
Only direct members can be provisioned.
-
Nested groups are not automatically flattened. Native recursion is not supported. Groups containing sub-groups require flat expansion.
-
Users must be provisioned before groups. Azure AD enforces this sequence. If Insight Archiving rejects membership references, groups are created but members remain empty until users exist.
-
Guest users with object IDs in Azure AD can be provisioned and assigned as members in Insight Archiving.
-
Shared mailboxes are supported if they are in scope and active.
To configure SCIM archiving by using Azure Active Directory
-
Ensure that your enterprise application is added to your Azure Active Directory tenant.
For more information, refer to Adding an application on Azure AD portal
-
Sign in to the Microsoft Entra admin center as an Administrator.
-
Browse to Entra ID>Enterprise Applications , and select your application.
-
In the left navigation pane, select Provisioning.
-
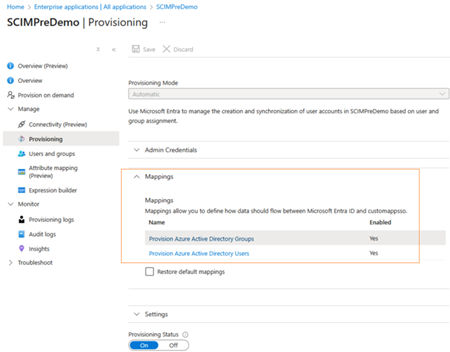
On the Provisioning page, expand the Mappings section.
-
To provision the Users attribute mapping, perform the following steps:
-
Ensure that the Provision Azure Active Directory Users option is enabled. Click to select it.
-
On the Attribute Mappingpage, the existing mapping properties are displayed. To add more mapping properties, clickAdd New Mappings. To edit existing properties, select theShow Advanced Optionscheck box and clickEdit attribute list for customappsso.
-
Refer the user attribute mappings below:Note: Create the SCIM schema in enterprise application. While creating the SCIM schema, you can set the attribute precedence ofPrimaryEmailAddressandUsernameas 1 or 2, as required. For example, if you set the attribute precedence ofPrimaryEmailAddressas 1, then the attribute precedence ofUsernameis consequently set as 2. If you set the attribute precedence ofUsernameas 1, then the attribute precedence ofPrimaryEmailAddressis consequently set as 2.
-
For more information, refer to Creating schema in enterprise application.
| AD Attribute | Arctera SCIM Attributes | Arctera Insight Archiving Source attributes | Example data |
|---|---|---|---|
| / Matching Precedence | |||
| User.Mail | emails\[type eq "work"\].value, IsPrimary=true | PrimaryEmailAddress | jsmith@organization1.com |
| / 1 | |||
| Append(\[extensionAttribute1\]+ @organization1.com) | userName | UserName | abc1abc@organization1.com |
| / 2 | |||
| givenName | name.givenName | FirstName | John |
| Surname | name.familyName | LastName | Smith |
| displayName | displayName | DisplayName | John Smith |
| accountEnabled | active | IsArchive | TRUE |
| proxyAddresses | emails\[type eq "work"\].value,IsPrimary=false | EmailAliases | "smtp:user1@organization1.mail.onmicrosoft.com", |
| "smtp:user1_alias@organization1.COM" |
-
To provision Groups , perform the following steps:
-
Ensure that the Provision Azure Active Directory Groups option is enabled. Click to select it.
-
On the Attribute Mappingpage, the existing mapping properties are displayed. To add more mapping properties, clickAdd New Mappings. To edit existing properties, select theShow Advanced Optionscheck box and clickEdit attribute list for customappsso.
-
Refer the group attribute mappings below:Note: UseDisplayNameas Primary Mapping attribute.
Group Attribute App Attribute Name Is Custom Attribute displayName displayName No objectId externalId No members members No description urn:ietf:params:scim:schemas:extension:veritas:2.0:Group:description Yes Mail urn:ietf:params:scim:schemas:extension:veritas:2.0:Group:mail Yes securityEnabled urn:ietf:params:scim:schemas:extension:veritas:2.0:Group:securityEnabled Yes mailEnabled urn:ietf:params:scim:schemas:extension:veritas:2.0:Group:mailEnabled Yes
-
-
After all of the required mappings are configured, select Save.
-
After successful configuration, generate a token from Management Console.
-
Click Generate.
-
Copy the generated token, and click OK.
-
Click Save.
-
Enter the copied token in the Secret field in the Azure enterprise application.
-
Click Test connection to complete the configuration.
If the testing is successful, configuration is considered as complete. If the testing is unsuccessful, contact the support team.
Related information