
Assigning roles, privileges, and monitored accounts to Azure AD groups
The Management Console supports synchronizing Azure Active Directory (AD) groups through SCIM or AD Sync. This capability allows administrators to centrally manage access to AD groups.
The Assign Active Directory Groups feature enables administrators to assign roles and privileges to AD groups directly from the Management Console. This reduces the need to manage reviewer roles on individual users-basis.
Before you use this feature, note the following facts:
-
By default, all synchronized AD groups are assigned the None role. At this stage, effective role and privileges of each member will be either their individual user role or other AD groups the user belongs to.
-
When administrators assign the Reviewer role at the AD group level, all direct members of the AD group automatically inherit the assigned reviewer privileges. A maximum of 100 members (user accounts) from a single AD group can be assigned case-level reviewer privileges.
-
Only the direct group members can be assigned the Reviewer role. The nested groups and their members cannot be assigned the Reviewer role.
-
The administrator can add, remove, and import monitored accounts while assigning roles and privileges to the AD group.
-
The Expiry date for monitored accounts will be highest date assigned from Individual user and all AD groups.
-
AD groups assigned with the Reviewer role can be selected as reviewers in Insight eDiscovery. However, the AD group role cannot be changed using Insight eDiscovery.
-
Administrators can assign case-level reviewer privileges to an AD group. All direct members of the AD group automatically inherit the assigned reviewer privileges for the selected case. When an AD group is added as a case reviewer, all its members are added as reviewers for the case.
-
If an AD group is deleted during synchronization, members of that AD group no longer retain the roles and privileges that were assigned to them through that AD group. In this scenario, each member's effective role and privileges will be either their individual user role or other AD groups the user belongs to.
-
If an AD group with case-level reviewer privileges is removed, the expiry date for its members is set to the group removal date. The members still remain listed as case reviewers. However, when such members log in to Insight eDiscovery with an expired reviewer role, the associated cases are not displayed to them.
To assign roles to Azure AD groups
-
In the left navigation pane, select Role Management>Assign Active Directory Groups.
The list of available AD groups is displayed.

-
Search for and select the AD group. You can use Advanced Search to filter the list of AD groups or enter the keywords of AD group name. Perform the following as needed:
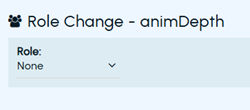
If the selected AD group has no assigned roles, the Roledrop-down on theRole Changepage displaysNone by default.
-
From the Roledrop-down menu, selectReviewer, and then clickSave.
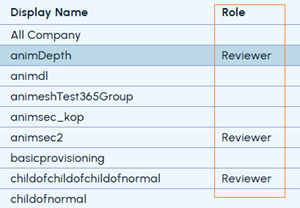
When you view the list, AD groups are displayed with their assigned roles. The Role column displays Reviewer when the reviewer role is assigned; otherwise, it is blank. Refer to the sample image below.
To assign privileges to Azure AD groups
-
In the left navigation pane, select Role Management>Assign Active Directory Groups.
The list of available AD groups is displayed.
-
Search for and select the AD group. You can use Advanced Search to filter the list of AD groups or enter the keywords of AD group name.
-
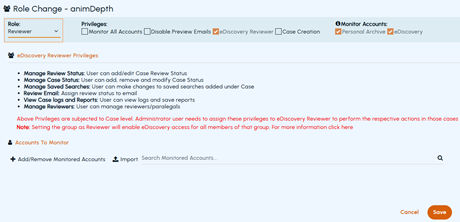
Under Privileges , select one or more of the following options:
Monitor All Accounts 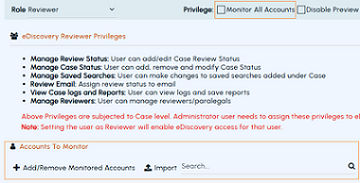
 - Select this option to allow the AD group to view archived messages for all archive accounts. When this option is selected, there is no need to complete the steps in the Accounts to Monitor section.
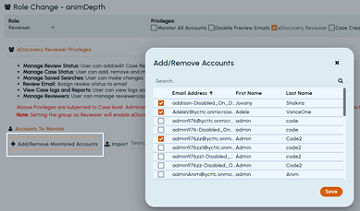
- Clear this option to allow the selected AD group to view archived messages for specific archive accounts. When this option is not selected, the Accounts to Monitor section is displayed, allowing archive accounts and AD groups to be added, removed, and imported. - To add monitored accounts, click Add/Remove Monitored Accounts . Select the archive accounts that you want the reviewer to monitor, and click Save . - To import monitored account, click Import , and do the following: a. In the Import Monitor Accounts window, download the sample .xls file, save it as a .csv file. b. Retain the PrimaryEmailAddress column heading, and enter only the primary email addresses of the archive accounts. Delete all content below the PrimaryEmailAddress column heading. c. Click Browse to select the prepared .csv file, click Import , and then click Save on the Role Change page. eDiscovery Reviewer 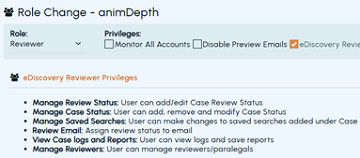 By default, this option is selected to allow the AD group to access Insight eDiscovery.
The eDiscovery Reviewer privileges section lists privileges that vary by case level. As an administrator, you can assign these privileges to the eDiscovery Reviewers to perform various actions while reviewing the cases. Disable Preview Emails Select this option to prevent the reviewer from previewing emails from other archive accounts. Case Creation Select this option to allow the reviewer to create cases in Insight eDiscovery. -
On the Role Changepage, clickSave.
After you save the changes made to the selected AD group, they are updated in the application and can be verified as follows.
-
Application-level changesa. In the left navigation pane, selectReports and Notifications>Logs.
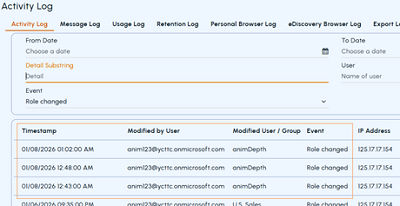
b. On the Activity Log page, specify the time period, Detail Substring, or a user name as available.
c. From the Eventdrop-down list, select Role changed option. ClickSearch to view the log as shown in the sample image below.
d. (Optional) Click the Download icon to save the report locally.
-
Account-level changesa. In the left navigation pane, selectRole Management>Assign Accounts. A list of archive accounts appears.
b. Search for the required archive account. Use any of the following methods.
-
Expand the Advanced Searchsection, specify the input, and clickApply.
-
Expand the Roles section, click on the required role.
-
In the Searchfield, enter the username or email of the archive account and click theSearch icon.
-
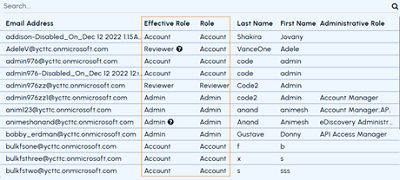
Refer to the Effective RoleandRole column values for the required archive account to verify the role changes.
-
Click the question mark (?) icon (if appears) in the Effective Role column to view how the effective role is determined based on AD group membership. The details appear as shown in the sample image below.

Related information