
Creating cases
The eDiscovery administrators can create cases and select which custodians to associate with the case. Once a case is created, all items (emails, collaboration messages, and files) for the case can be placed on legal hold to ensure that the items are retained.
AI-enabled case creation is also available to help administrators create cases more efficiently. However, to view and configure AI features during case creation, AI capabilities must be enabled at the group level. For more details, contact Arctera Support or your system administrator.
To create a case
-
On the eDiscovery tab, clickCases.
-
Click Add Case.
The Add New Case dialog box appears.
-
Under Case Status , specify the following details:
Case Status Select the Active option. Legal Hold By default, this option is set to OFF. Switch this field to ON or OFF to toggle the options whether to apply a case-level legal hold to case items. Number of custodians Displays number of custodians associated with the case. Number of Items Displays the total count of items associated with the custodians selected for the case. Note: Items collected during the investigation may include items associated with custodians who are not part of the case. Thus, if not all custodians associated with the case are selected, the item count may differ. Expiration Date Displays case expiration date. Number of Items on Legal Hold Displays number of items in a case that are on legal hold. -
Under Case Details , specify the following details:
Apply Legal Hold Click Yes to toggle the option between Yes and No. The Yes option applies a case-level legal hold to items, and is the default value. Note: This option keeps all items for the case on legal hold until the administrator removes the legal hold. Name Enter a unique name for the case. Description Optionally enter a description for the case. Expiration date Select Never Expires , or enter an expiration date for the case. After the expiration date a case's status changes to inactive. An inactive case becomes read-only for reviewers, but all its associated data and any hold remains intact. The eDiscovery administrator can revert an inactive case back to active status. Filing date Specify the case filing date. Case Type Specify the type of case. Department Provide the department details. Matter Number Provide the matter number. Court/Docket Provide the court and docket number. Additional Staff Members Provide the additional staff member names involved in the case. Case Notes Provide a note for a case, if required. -
Under Custodians for Case , do one of the following:
-
Select All Custodians to include all the archive accounts as accounts that may be searched for this case.Note: If underCase Status, theLegal Holdoption is set toON, and underCustodians for Case, you select theAll Custodiansoption, the application displays the following message:
-
This alert message recommends you to select specific custodians instead of all custodians to avoid performance issues. However, if you are sure about selecting the All Custodians option, clickYes. Else, click** No and select the Select Custodians** option.
When you select the All Custodians option, theAdd Custodians option remains disabled.
-
Select Select Custodians to choose the archive accounts that you want to include for search. TheAdd Custodians option gets enabled. ClickAdd Custodians and select the required custodians, then clickSave. The** Add/Remove Custodians** dialog box appears.
-
(Optional) Select Search Between Custodians at the bottom of the pop-up to retrieve emails exchanged exclusively among the selected custodians. For details, See Searching emails exchanged among specific custodians.
-
Expand the Manage Custodians to search and select the available custodians across the pages and clickUpdate.
-
Expand the Selected Custodians to view your selection. To remove the selected custodian, click theDelete icon beside it and then clickUpdate.
-
-
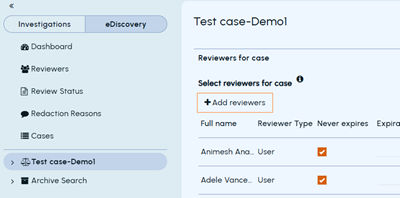
Under Reviewers for Case, click** Add Reviewers** and do the following as required:
-
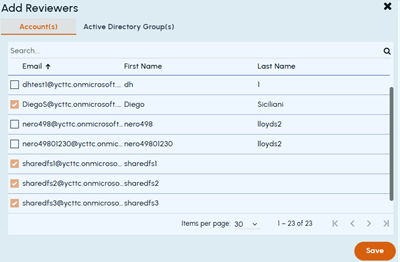
On the **Account(s)**tab, select one or more individual reviewers for the case, and then click Save.
-
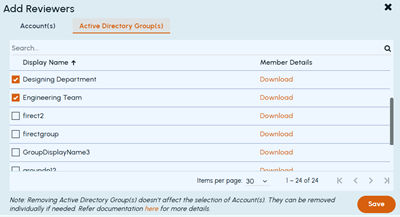
On the **Active Directory Group(s)**tab, select one or more Active Directory groups for the case. To view group members, click Download next to the group name and review the downloaded file, which displays names of direct members of the corresponding Active Directory group. Then click Save.
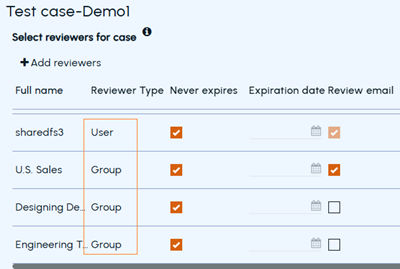
The assigned Accounts and Active Directory groups are displayed on the case details page as shown in the sample image below.
Note :
-
When you add one or more Active Directory group reviewers to a case, the application displays a notification indicating that the selected reviewers do not have access to Arctera eDiscovery. However, after you save the case, the notification is cleared and Arctera eDiscovery access is automatically enabled for the members of such groups when they log in to Arctera eDiscovery.
-
The assigned Active Directory Groups appear as reviewers at the following spaces on the eDiscovery tab:
-
Select the Reviewers node and search for newly added Active Directory group(s).
-
Select the case > Case Documents>Create Review Set. The system lists case-specific reviewers, where you are required to assign a review share percentage to each reviewer.
-
Select the case > Case History.
-
-
Under Customizations , select the review statuses that need be available to the reviewers when they review each message.
Under Set Review Status to , do any of the following:
-
Select Default and clickView to use the default list of review statuses in their default order.
-
Select Custom and clickChoose Review Status Tags to choose which review statuses are to be used with this case.
-
Under Redaction Reasons , select the redaction reasons that need to be available to the reviewers when they review each message.
Under Set Redaction Reasons to , do any of the following:
-
Select Default and clickView to preview the by default selected redaction reasons.
-
Select Custom and clickChoose Redaction Reasons Status to choose the redaction reasons to be used with this case. Then, clickView to preview the selected redaction reasons.
-
Under Case Tags , add parent tags and their child tags.
Before you add parent tags and their child tags, See Adding parent tags and their child tags.
By default, it is set to None.
Select Custom>Customize Case Tags to add a case-specific tags.
Click New Case Tag to create a new parent tag. Provide a unique tag name and comments for this parent tag.
If required, add child tags, and click Done.
Note: Under the parent tag, you can add a maximum of 10 child tags up to three levels in the hierarchy. Adding tags with same names under different parent is permitted. However, you cannot save a new tag with a duplicate name in the same window; you must save other identical tags individually first. TheNew Case Tagfunctionality lets you create multiple tags simultaneously. While applying tags to the searched items, you can select multiple tags.
-
Under AI Features , do the following:
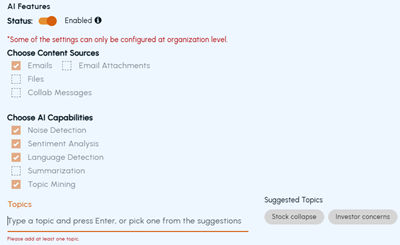 Note: TheAI Featuressection appears on theAdd New Casepage only when AI capabilities are enabled at the group level. To enable this option, contact your system administrator or Arctera Support.
Status Use this switch to enable or disable AI-enabled case creation. By default, this option is set to OFF. Switch this field to ON to enable AI-enabled case creation, or to OFF to disable the feature. Choose Content Sources Emails is selected by default as the content source for AI-enabled case creation. Other content sources, such as Email Attachments, Files, and Collaboration Messages, are not included in AI-enabled case creation at this time. Choose AI Capabilities The following capabilities are enabled by default\: - Noise Detection - Sentiment Analysis - Language Detection - Topic Mining Topics Enter a topic and press ENTER. Alternatively, select one or more topics from the Suggested Topics list. -
Click Save Case to create the case with your selected options.
Related information