
Exporting emails
To export emails:
-
On the eDiscovery tab, click Cases.
-
Search for and select the case in which you want to search emails. The selected Case_Name node appears below Cases.
-
Click New Search to create a new search. Else, expand Research Sets or Review Sets to select existing search.Note: You can access existing saved searches of the selected case from the Review Set and Research Set nodes. Alternatively, you can click New Search, perform advanced search or query search to get the expected items. See Performing Advanced Search and Query Search. After performing a new search or accessing the existing searches from review set and research sets, the application displays the filtered emails, collaboration messages, and files in the details pane.
-
On the Emails tab, select the emails you want to export. Click Export, and do any of the following:
-
Click Export current page to export all the emails displayed on the selected page.
-
Click Export selected emails to export all the selected emails from the search.
-
Click Export all emails to export all the emails available search.
-
Click Export by custodians to export all the emails from the selected custodians.
-
-
Click Export, and do any of the following:
-
If you are exporting all emails in the search, all emails displayed on the page, or selected emails, in the Export Options dialog box, do the following:
Field Description Message Format Select the appropriate message format. By default, the PST format is selected. The available message formats are:•Clearwell•EML•EML with EDRM•PST with EDRM•MSG with EDRM•FTI-RingTail•EDRM Only•PSTWhen exporting messages to PST, the export may fail or stop responding if the batch contains calendar invitations with very large embedded attachments, such as oversized Base64 files. In such cases, the export may show failed items, and a usable PST file may not be generated. Resubmitting the same failed items may result in the same export failure.To resolve this issue, the Arctera eDiscovery application excludes only the oversized Base64 attachment from the item being exported. The calendar invitation itself is still exported with its key details, such as subject, organizer, attendees, date, time, location, message body, and reminders.During export, if an oversized Base64 embedded attachment is excluded, a Skipped_Attachments_Report.csv file is generated in the export output folder. Reviewers can refer to this report to identify the affected items and understand which attachments were excluded from the PST export.•Original EDRMIf you select this option, the exported file includes emails in both MSG and EML formats, allowing you to work with the emails in the format that best suits your needs. In addition, the exported file includes the edrmXML.xml and HTMLReport.html files in their original formats. These files facilitate the smooth transfer of electronically stored information (ESI) between different software programs during the electronic discovery process.•OriginalIf you select this option, the exported file includes emails in both MSG and EML formats, allowing you to work with the emails in the format that best suits your needs.Note: The Original EDRM and Original message formats are available only to users listed in the Configuration_Override table in the Arctera Unified Platform database. To make these options available in the Message Format drop-down field, contact Arctera Support. Include Journaling Envelope Select this option to include journaling envelopes, which contain information about email recipients, such as distribution lists. Exclude Exported Messages Select this option to exclude the exported messages. Enable AES-256 Encryption Select this check box to secure access to the downloaded export batch. Export Name Specify a name for the export batch. By default, the search name is used. You can change it if required. Export Password Enter the password that users must provide to access the exported batch of messages. Confirm Password Re-enter the password for confirmation. Generate Azure SAS URL Note: This button is available only if the Export to Azure private storage location feature is enabled for your account in the Arctera Management Console.Click Generate Azure SAS URL to generate the Azure Blob SAS URL for your private storage location and save it for future use.For security reasons, the application does not display the URL the next time. If you lose the URL, click Generate Azure SAS URL again to generate a new URL and save it securely.After you click Export in the Export Options dialog box, the selected items are exported to the Azure private storage location. You can use Microsoft Storage Explorer to access the exported items. Share Export Click Select Admin to choose the recipients of the export batch, and then click Update.Note: You must manually share the export password with the administrators and follow your organization's security policies. -
If you are exporting emails by custodians, in the Add/Remove Custodians dialog box, search for and select the custodians.
-
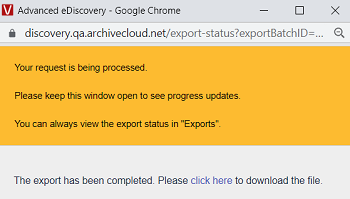
Click Export.Note: The exported batch can either gets downloaded as a single or multiple file segments.
-
Click Click here to download the exported batch of emails.
-
To confirm the status of batch export, on the eDiscovery tab, under the selected case node, select Exports, and search this export batch name.
Related information