
Assigning the reviewer role and privileges to Active Directory groups
To assign the reviewer role and privileges to the Active Directory group
-
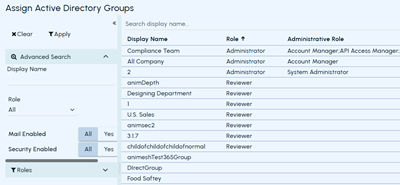
In the left navigation pane, select Role Management>Assign Active Directory group.
The application displays a list of available Active Directory groups synchronized from identity sources such as SCIM and Microsoft 365. To view the members of a group, click the Download icon next to the required group name. The downloaded file contains the names of all users who are members of the selected Active Directory group.
-
Search for the Active Directory group to which you want to assign the reviewer role.
The Role Change page appears. To search for the required Active Directory group, you can use any of the following methods. The filtered options appears automatically.
-
Quick search: Enter the user name or email of the group in the search field, and click the** Search** icon.
-
Advanced search: In the corresponding fields, enter the email, name, or role, and click** Apply**.
-
Role-based search: Select a role in the** Roles** section.
-
Select the Active Directory group.
Note: If the selected Active Directory group has no assigned roles, the** Role drop-down on the Role Change page displays None** by default.
-
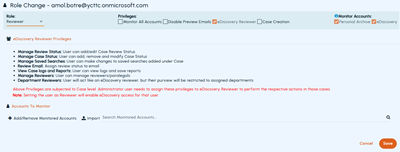
In the Role drop-down, selectReviewer.
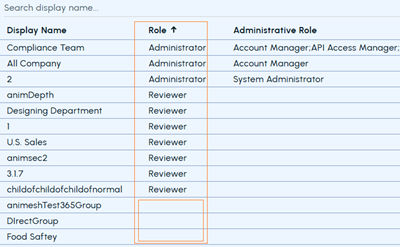
When you view the list, Active Directory groups are displayed with their assigned roles. The Role column displaysReviewer when the reviewer role is assigned; otherwise, it is blank. Refer to the sample image below.
-
The Privilege field displays the following options:
Monitor All Accounts 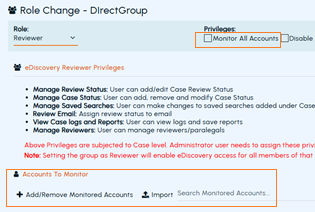
 Select this option to allow the Active Directory group to view archived messages for all archive
accounts. When this option is selected, there is no need to complete the steps in the Accounts to Monitor section. Clear this option to allow the selected Active Directory group to view archived messages for specific archive accounts. When this option is not selected, the Accounts to Monitor section is displayed, allowing archive accounts and Active Directory groups to be added, removed, and imported. Click Add/Remove Monitored Accounts to add new accounts for monitoring. If you want to import monitored accounts, click Import . See Importing multiple user accounts for monitoring . eDiscovery Reviewer  By default, this option is selected to allow the Active Directory group to access Arctera eDiscovery.
The eDiscovery Reviewer privileges section lists privileges that vary by case level. As an administrator, you can assign these privileges to the eDiscovery Reviewers to perform various actions while reviewing the cases. Disable Preview Emails Select this option to prevent the reviewer from previewing emails from other archive accounts. Case Creation Select this option to allow the reviewer to create cases in Arctera eDiscovery. -
On the Role Change page, clickSave.
After you save the changes made to the selected Active Directory group, they are updated in the application and can be verified as follows:
-
Application-level changes
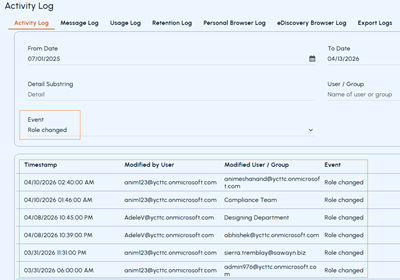
a. In the left navigation pane, select Reports and Notifications>Logs.
b. On the Activity Log page, specify the time period, Detail Substring, or a user name as available.
c. From the Event drop-down list, select Role changed option. ClickSearch to view the log as shown in the sample image below.
-
Account-level changes
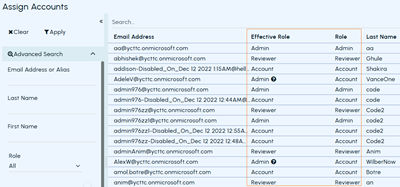
a. In the left navigation pane, select Role Management >Assign Accounts. A list of archive accounts appears.
b. Search for the required archive account. Use any of the following methods:
-
Expand the Advanced Search section, specify the input, and clickApply.
-
Expand the Roles section, click on the required role.
-
In the Search field, enter the username or email of the archive account and click theSearch icon.
-
Refer to the Effective Role andRole column values for the required archive account to verify the role changes.
-
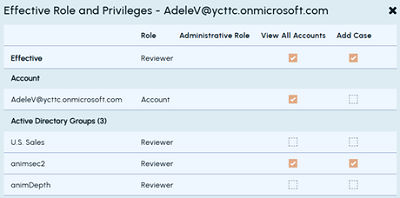
Click the question mark (?) icon (if appears) in the Effective Role column to view how the effective role is determined based on Active Directory group membership. The highest role becomes the effective role. The details appear as shown in the sample image below.
Related information