
Configuring Google Provisioning collectors
Arctera Management Console supports archiving user data and mail-enabled user groups from Google Workspace without the need for additional licenses from Google. Administrators must have super administrator privileges to configure the Single Sign-On (SSO) settings that enable data archiving from Google Workspace. For a successful configuration, perform the following steps:
Prerequisites
You must have the super administrator role and privileges to configure Google Provisioning for SAML-based SSO authentication to your custom SAML app. Upon successful configuration, the SSO sends a SAML request to Google Provisioning as an Identity Provider (IdP), and then sends a SAML response to the SSO confirming the user identity.
Configure Google Provisioning for SAML-based SSO authentication to your custom SAML app
Note: This section provides a quick reference for configuring Google Provisioning for SAML-based SSO authentication. For the precise configuration procedure, refer to the Google Admin Help documentation: Set up your own custom SAML application.
To configure Google Provisioning for SAML-based SSO authentication to your custom SAML app:
-
Log in to the Google Admin console as a super administrator.
-
Select Apps > Web and mobile apps.
-
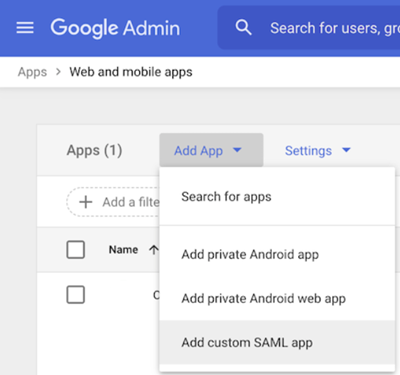
Click Add App, select Add custom SAML app as shown in the following sample image, and perform the following steps:
-
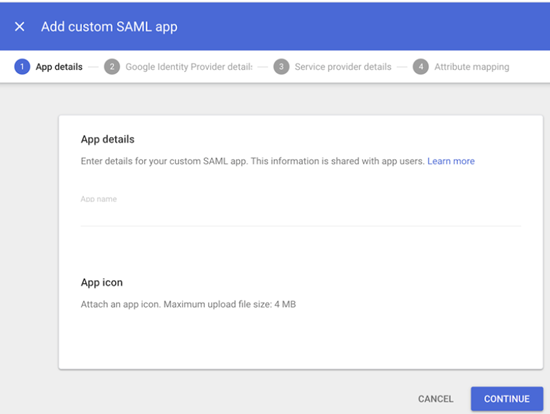
On the App details page, specify a unique app name, description, and app icon, and then click Continue.Uploading an app icon is optional. If you do not upload the icon, Google Provisioning creates a new icon using the first two letters of your app name. This information is shared with the custom SAML app users. The icon appears on the App settings page and in the Web and mobile apps list.
-
On the Google Identity Provider details page, use one of the following options to get the required setup information. These parameters are required to configure the SSO integration and to verify connectivity between Google Provisioning and the custom SAML app.
-
Option 1: Download the IDP metadata file.
-
Option 2: Copy the SSO URL, Entity ID, and SAML 2.0 Certificate. Save this information securely to use while setting up a service provider.
-
-
On the Service provider details page, enter the following details:
-
ACS URL: Enter the URL that should receive the SAML response after authentication. It must begin with https://.
-
Entity ID: Enter the Entity ID copied from the previous step.
-
Start URL: (Optional) Enter the URL to which the SAML app should redirect users after successful login or authentication to the app.
-
Signed Response: (Optional) Select if the service provider requires the entire SAML authentication response to be signed. Do not select this option if the service provider requires only the assertion within the response to be signed.
-
Name ID format: Define the naming format supported by Google Provisioning. Select the Email format from the drop-down list.
-
Name ID: Select Basic Information > Primary email.
-
-
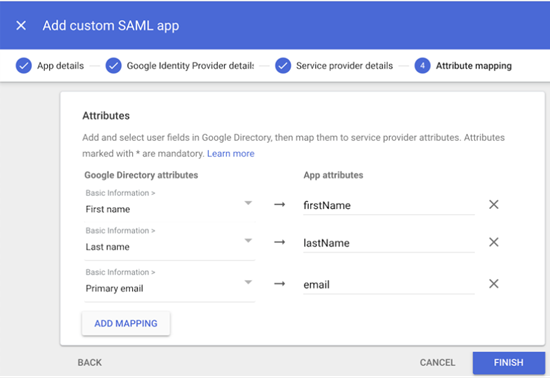
On the Attribute mapping page, click Add Mapping and use the Username, Primary email, First name, and Last name Google Directory attributes and App attributes as shown in the following sample image.
-
-
Click Finish.
-
Select Apps > Web and mobile apps, and open your custom SAML app.
-
Ensure that the parameters configured for the app appear correctly.
-
On the User Access pane, click View details, and do the following:
-
Select the required users, groups, or organizational units (OUs) for which you want to enable the service. By default, no users, groups, or organizational units have permission to access the app.
-
In the Service status section, click ON for everyone, and then click Save to activate the service for all selected users.
-
-
On the User Access pane, in the left pane, click Test SAML login.The SAML app should open in a separate tab. If it does not open, check the error messages, update your Identity Provider and Service Provider settings as needed, and then test the SAML login again.Usually, the change takes place quickly, but sometimes it may take up to 24 hours.
Enable the Google Workspace service
After successful SAML-based Single Sign-On configuration, administrators need to enable the Google Workspace service in the Arctera Management Console.
To enable the Google Workspace service:
-
In the left navigation pane, select Configuration > User Management.On the User Management page, select Manage Account Provisioning Remotely > Using Google Workspace.
-
Click Save and then click Go to next step.
-
Ensure that the Configuration Summary page displays the completion of the Google Workspace configuration.
Configure the Google Provisioning archive collector
Administrators need to set up the Google Provisioning archive collector in the Arctera Management Console to archive user data and mail-enabled user groups from Google Workspace.
To configure the Google Provisioning archive collector:
-
In the left navigation pane, select Archive Collectors.
-
On the Archive Collector page, click Add collector to view the available collector cards.Note: When adding the first collector, the Add collector button appears in the middle of the screen. If one or more collectors are already added, the Add collector option appears in the upper-right corner. If you select an unsupported collector, the Configure button is disabled to prevent its configuration.
-
Select the Google Provisioning card and click Configure.The Google Workspace Account Provisioning page appears.
-
On the Provisioning and Configuration tab, specify the following information and click Next to proceed to the next page.
Provisioning Provisioning Domains scope Archive Provisioning Provision Groups in scope as Archives Personal Archive Deployment Options Impersonate User Email Choose Certificate Service User Email Sync Scheduler Run Now Go to Job List Configuration Summary Credential ManagementUpon accessing this page, a notification prompts you to enable the API Client OAuth 2.0 scopes based on the selected provisioning options. You need to create a service account and set up a client with the necessary API Client OAuth 2.0 scopes. To better understand the procedures, refer to the following documentation:-
Create a Google Cloud Service Account
-
Set up domain-wide delegation for a client
After creating a Google Cloud service account and configuring domain-wide delegation for a client, click Test Connection to verify that the connection works.SchedulerSummary -
-
After successful synchronization of accounts, in the left navigation pane, select Configuration > Account Management. Ensure that the accounts for which you have created archives are available. You can view the account user details, the status, the services subscribed and enabled or disabled for users, archive aliases, and the history of the account.If the data is not getting synchronized properly, contact your system administrator.