
Creating a new data request
The New data request page is where a data request is created and submitted. This page contains multiple sections where parameters can be defined to refine the search criteria.
To create a new data request
-
In the left navigation pane, click Application.
-
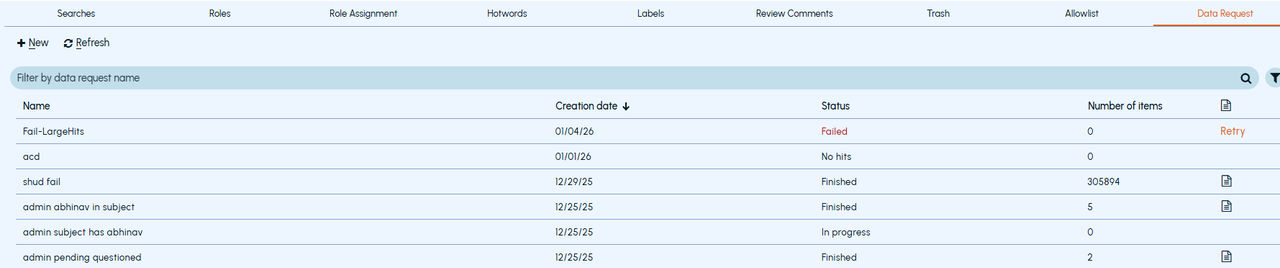
Click Data Request.
-
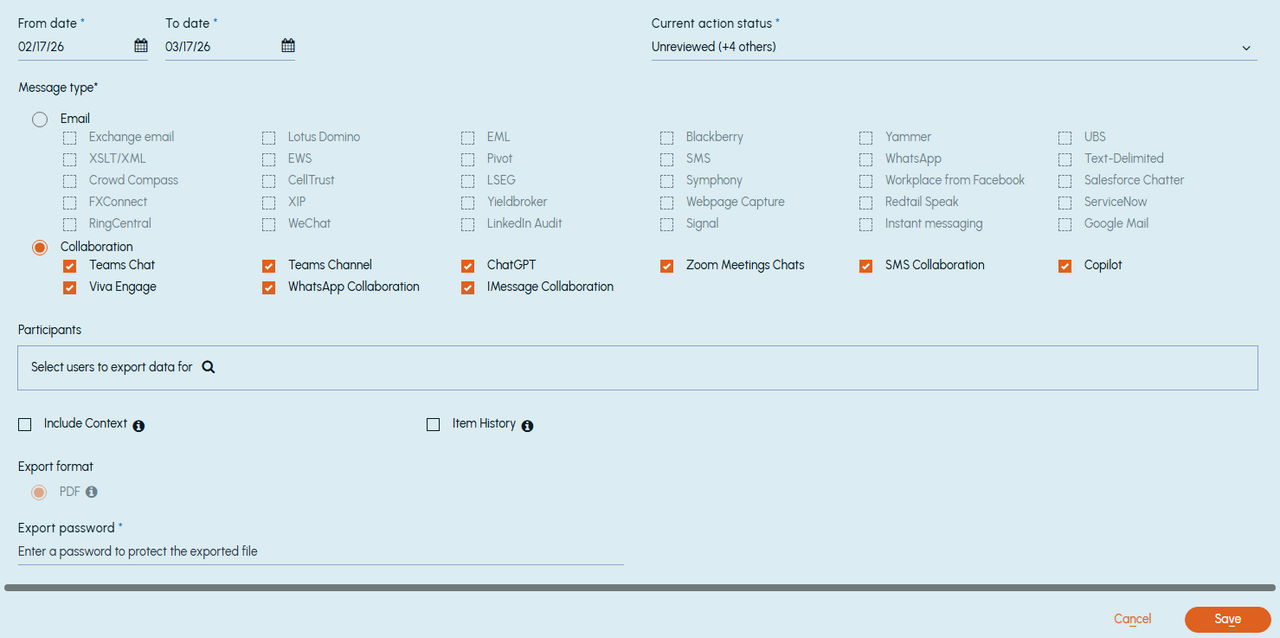
Click New. The** New data request** window appears.
-
Refer to the following table and provide the relevant information in the respective fields.
Name Enter a unique name for the data request. This name appears within the Data Request page. The data request name is also used as the exported ZIP file name with the number sequence when the user downloads the exported file. Note: The name cannot contain any of the characters: /*?":<>\| From date / To date Specify the start and end date for the emails or collaboration messages to search. Current action status Select items by their action status, such as Unreviewed , Pending , Questioned , Reviewed Irrelevant , and Reviewed Relevant . Message type Select the communication data type to export: Email or Collaboration . Authors and recipients Enter an email address or domain name, and then press the Enter key. - Use these fields to filter a search for specific FROM or TO email addresses or domains. Up to five Senders and Recipients can be specified. - Address or domain must not contain wildcard characters and a space character. - Addresses on the left side cannot be blank. - If no address or domain is specified on the right, items will be searched for any internal or external user. If addresses or domains are specified, then items will be searched for any of those addresses or domains. Select the message direction for email communication between addresses or domains. The three options available are listed below. The message direction can be: - Search between the authors and recipients mentioned on both sides: This option retrieves ALL emails exchanged between the email address or domain name on the left and the email address or domain name specified on the right. - Search between the authors on the right and recipients on the left: This option retrieves ALL emails from any of the sender email address or domain name on the right and any of or all of the recipient email address or domain name on the left. - Search between the authors on the left and recipients on the right: This option retrieves ALL emails from any of the sender email address or domain name on the left and any of or all of the recipient email address or domain name on the right. Note: The search items must be part of a review set. Subject Enter the subject keyword or phrase, and then press the Enter key. Note: If you need to use phrases, then enclose the phrases within straight double quotation marks. Participants Select the users whose collaboration messages you want to export. 1. Click the Search (magnifying glass) icon. 2. Select one or more users. 3. Click OK . Include Context Select this option to include adjacent messages (before and after) for the day in order to provide conversation context for the exported messages. Include Item History Select this option to include the history of actions performed on the items, such as comments, status changes, or review actions. Export Format Specify the format in which collaboration messages should be exported. Currently, only PDF is supported. Note: Emails are exported in PST format by default. Export Password Enter a password with which to protect the files that are returned from this request. The exported ZIP file would be protected with a password. The password must have at least 4 characters and a maximum of 6 characters. Note: Ensure you remember this password. If you forget the password, you will not be able to access the exported files. In that case, you must create a new data request. -
Click Save.
The newly created data request will appear on the Data Request page with a link to get the exported ZIP file.
-
Click the link to download the zipped file.Note: The export download link expires 15 days after it is generated. If the link expires, you must create a new data request to export the data again.
Related information